Thursday, December 9, 2010

A DIFFERENT KIND OF SYMPATHY CARD...

Hi all~ Today I have a sympathy card to show you~ one for a four legged friend. Often times the grief can be heartbeaking when we lose this type of family member. And for that, there is a special kind of sympathy card.
My Mother in Law called me to tell me that a cousin of hers had recently lost a beloved member of the family. Although she was 15, it was still very hard for them to say goodbye. My Lab is 13 now, and in poor health, and I am dreading this day.
But, I made them a "pet sympathy" card which I think came out pretty cute. It uses the SU set "D Is For Dogs". I have a feeling that this set was recently discountinued, but please correct me if I am wrong. The card is made with a pull out insert to give it a bit more interest. I used a yellow from DCWV paper pad, and scraps for the designer paper.
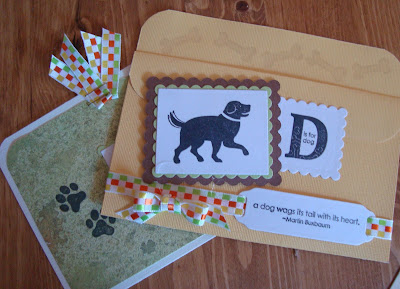
Everything has been cut out with Spellbinders and the dog is adhered with foam tape for extra dimension.
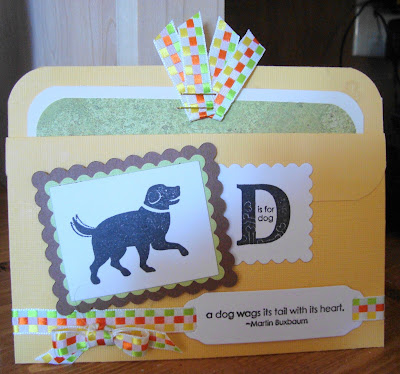
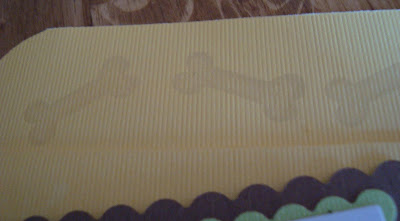
Acroos the top of the yellow cardstock, I stamped the dog bone in Versamark ink, and then clear embossed it. I like this look, as it adds interest while remaining subtle. I dont think I have used this technique before, but will certainly add it to the list. Its easy and adds a big impact.
This photo shows the inside of the card, where I again used nesties, and then stamped the dog paw in Memento Black ink. I stapled 2 small pieces of ribbon to the top as a pull out device. Easy peasy~

For the ribboon slider, I used Tags Trio from Spellbinders, running a ribbon thru the back and finishing it off on the back of the card.

Another view of the entire card. Colors are a bit off, its a really pretty banana type of yellow, and a celery green.

Many thanks for stopping by...

Monday, December 6, 2010

TU TU CUTE!

Here is a card I made last week for the sweet little girl in the previous post.
I thought the adorable mouse and matching sentiment was perfect for an almost 2 year old~
The card was a "welcome to the family" greeting. She arrived from China in May, and this was the first time we got to meet her.
Cardstock is SU, designer paper is from my scrap bin. I used SU Top Note die to cut the white cardstock and then ran it thru my Big Shot with the swiss dot embossing folder.
The oh-so-cute mouse is from My Favorite Things. What I like about their stamps, is that they always give a crisp clean image. Thats especially important when the image has so few lines and details.
She is colored with Copics, and mounted with foam tape.
The sentiment was also perfect!!!
Many thanks for stopping by...


Tuesday, November 30, 2010

THANKSGIVING PART 2

We had such a great Thanksgiving weekend, that it could'nt be contained in one post!
Time goes by so quickly, and we should all try to make sure that we can enjoy friends and family as much as possible.
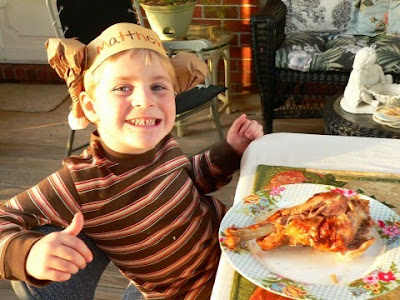
Here is my niece Jacqueline, making her signature cranberry sauce turkeys for our feast. Matthew is keeping a close eye! Another photo of him in his "turkey leg hat". Isnt this the cutest?
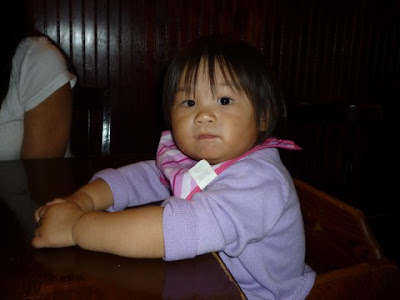
My newest little cousin~ Noelle.


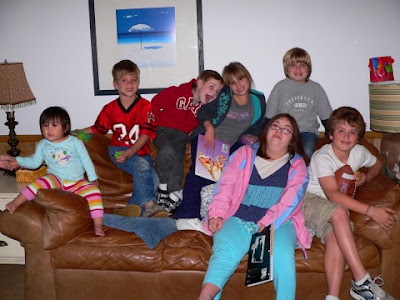
All the cousins, except my 2 boys enjoying the beach house on Seans birthday.


Sean, me and Jackie.
Jackie and Sean. They are only 4 months apart.

Many thanks for stopping by...


Saturday, November 27, 2010

OUR THANKSGIVING FEAST!

Hi! Hope by now everyone has recovered from their holiday of eating , shopping and enjoying family. I thought I would share some photos of our day.
We had the largest crowd ever at our present home. 18 people. It was originally going to be more like 22, but a few didnt make it. We were very lucky this year to share our day with some special cousins from Florida. We had not had Thanksgiving together since we were kids, so it was extra special. My cousin Gene, his wife Katy, and their 4 children, including their newly adopted daughter from China drove around 12 hours to spend a few days with us.
Watching our kids all play together made us think back to when that was us. Wow, time really flies, doesnt it??
Here is my cousin Gene, and my brother in law John waiting for the turkey to be served.

We had sunny, warm weather, which was great, as I dont have a large enough table in my dining room to seat so many. Next best thing is my screened porch. Its large, and we set up 2 folding tables. That, combined with all the other seating in there made for plenty of room.
We also had the pleasure of welcoming my husbands Aunt, Uncle and family to our neck of the woods this past July.
So they also joined us. Everyone brought something, and it was great!
Here is my nephew Matt wearing his turkey leg hat he made in preschool last year. I should have taken a side view photo. He is way too cute wearing this.
And although this picture is blurry, I wanted to introduce you all to the newest member of our family, celebrating her very first Thanksgiving here in America~ Noelle.
Shes a little doll.

Many thanks for stopping by...


Monday, November 15, 2010

MY CHRISTMAS ORGANIZER

I have been busy lately getting ready for a craft show, which is now over. Instead of only paper crafts, I have delved into the NEW TO ME world of jewelry making. Charms, to be exact. More on those in a different post, with a chance to win one.
But for now I present to you a Christmas organizer that I made for myself. It is not completely done, but enough of it is to ahow you how its coming. It just needs some ribbons on the binder rings (after I switch those out for smaller ones) and some paper cut to size inbetween the categories to make my notes.
This is a sneak peek of the cover, Santa and I are both busy starting to make lists of what presents we will be delivering. He is a stamp from Taylored Expressions. Isnt he adorable?? Here is the cover. The paper is from a stack I have from last year, and the base of the book was a chipboard base also from my stash.
Below are the first 2 pages. I have mixed old and new thruout this book, cause I can seldom make something without at least a few vintage touches. The fabric trim is quite old!
The pocket on the left will hold coupons. The crochet flower has been in my art studio for years.

Next up, we have an old bingo card, doilies, a cute little girl from long ago, and some scrunchy seam binding that I made myself. It was originally white. I dyed it and then scrunched it up while it dried.
This pocket is for receipts.
What Christmas book is complete without a photo of Santa and children on his lap?
This folded pocket has some little pom pom trim (new) and will hold my to do lists and notes from me to me. haha~
This spread is maybe my favorite. I love the old cone cut right out of a vintage cookbook~
There are some SU felt snowflakes, and a little banner that reads "sweet".
I also like the expression on the little girls face on the lower right. Shes a cutie.
This pocket will hold any gift cards I pick up along the way, and where I will put their receipts incase they were never activated. Dont you hate when that happens?
Lastly is my recipe pocket. I like trying new holiday recipes, and often cut them out of newspapers, magazines, and collect them in grocery stores. But I dont add them to my big cookbook until I have tried them and know I'll be making them again. So this is a perfect place to put them.
The left side has a card front that some of you may recognize. It was my Christmas card last year!
Detail of the tabs.

Many thanks for stopping by...
Hope you are all getting started - or making progress with your holiday planinng!


Tuesday, November 2, 2010

SOME HALLOWEEN PHOTOS

Hope you all had a great weekend!!! Halloween is always so much fun~
TT and I always carve a pumpkin on our screened porch the afternoon before trick or treating. She has become the master of scraping those seeds. I tease her and tell her we will hire her out to clean other peoples pumpkins.
This year she was a ladybug, and a cute one at that. Unfortunately, she had a terrible cold, and opted to give out the candy in costume rather than trick or treat.

We had a great time anyway.


Many thanks for stopping by...


Friday, October 29, 2010

SCARY SKELETONS!!!!!

Today I will show you what I made for my sister for Halloween. I had seen an idea on someones blog where they put a whole plastic skeleton which they had cut up into a jar of water.
My version uses only the heads and I did not use any water. I used a jar I got at the dollar store rather than one I already had. I then kept pouring the heads in different ways until I like the way they looked.
I added a couple rows of black ribbon around the top. Then I went to my document section of my computer, where I had stored some neat digi stamps that would be perfect for the occasion.
I placed this one on top after matting it with some scalloped cardstock in spooky colors. I added some black Primas to the center and a green crystal.
Then I thought some green Stickles would look great around the perimeter. Well, they did until I realized that I had put my fingers into them while they were still wet! No worries, at least I didnt smear them, and as soon as this photo was taken, I went back into the art studio to fix it.

This is the tag to perfectly go with my skeleton head jar. Again, its a digi image from My Grafico.
The funniest thing was, my little 5 year old nephew kept asking his mom when they could go into the backyard and plant these heads to "grow" their skeletons!!! LOL. He was totally convinced. My sister and I decided she should plant a full body skelton in the yard and see what happens~ when he finds it.
I'll let you know!!!
Enjoy your Halloween weekend~
Many thanks for stopping by...


Wednesday, October 27, 2010

Saturday, October 23, 2010

YARD SALE SATURDAY

Another installment of Yard Sale Saturday!!! I so look forward to this morning each week, when my husband and I go out hunting treasure. I would so rather do this than shop in a mall~
Some days good- some bad. But thats the fun of it~ you never know what you may find!
Today was a good one! This first picture shows an awesome price for an old train case. $2.00??? Really??
That is such a steal~ Its a really pretty green color and in perfect condition on the outside. Not even a scratch or tear. Usually when you see these, they are in pretty rough condition. The handle is not loose at all, and the locks work~
Now for the inside. Its a rich hunter green color. The mirror is dirty, but not cracked. The fabric is not torn or shredded, but it is stained in a couple of spots. The woman must have kept her toiletries in here, and they must have leaked a little.
No problem, I will try to wash it and get some of them out. Only after I got home, and opened it up again to look inside- I found a lucky penny inside!! Heads up and all. Funny thing- I did not see that when I was contemplating buying it, and I searched it pretty good. Maybe this mystery penny WILL bring me some luck~

Another sale got me this beeswax candle kit. I love the way beeswax smells. I used to make these years ago.
And that tiny little wisk was in a box marked "free". Not sure what I will do with it, but its so little and cute.
The techer book- also tiny was 25 cents. Its got nice poems in there and vintage prints of children. I will be cutting that up for some future projects for sure~

A brand new Breast Cancer Awareness t shirt for 50 cents. I love that saying!!
Also a silver plated sugar bowl that reminds me of a trophy cup. My sister in law and I saw these made into adorable bird feeders and garden art at a craft show. Ill have to give it a try.
My next favorite?? garden art statues!!
How beautiful is this baby mermaid sucking her thumb?? She is made of concrete, not that crummy resin (we have lost a couple of heads off of angels made form resin). She is about 15 inches high and sits like a little lady.

This closeup is to show you her hair~ which is all casted from shells. Shell hair?? What a good idea for a mermaid.
She is already out in my front yard.

Joining her, last but not least are this pair of little birds on a branch. They are also concrete~ and adorable.
Both of these statues were $5.00 each. I asked the guy if he would take any less, but said no. Thats ok, as I love them and would have been sorry if I had left them there.

Many thanks for stopping by...
Enjoy your Saturday also!

Wednesday, October 20, 2010

THE WORLD IS YOUR OYSTER MY PUMPKIN


A wonderful video with some young adults with DS talking about their life and accomplishments. So much still yet to achieve my sweet TT~
Please scroll down and silence my music (bottom middle of page) so you will be able to hear them speak.

Many thanks for stopping by...
Tuesday, October 19, 2010

2 SIMILAR CARDS

About a month ago, I ordered this cute stamp from Kraftin Kimmies Halloween collection. She sat unopened until the other day. While I intended to make one card with her, she was so cute, I had to make 2!
They are both quite similar. She is colored the same, except for her stockings. The Copic colors are below.
Both cards also use a 6 by 6 inch paper pad by Basic Grey called The Eerie Collection. I have it from last year. Here is the first card. The sentiment is stamped, colored purple with Copics and made into a flag shape. I then used foam tape for the edges and bent the cardstock out as I went.
Next card had glittered edges arouund the image. Glitter is Martha Stewart, as is the spiderweb edge punch.
The ribbon is from Michaels. Green cardstock is Stampin Up. I think this color is now discontinued though.

I have also used a little SU Crystal Laquer on the whites of her eyes, but its almost impossible to see in these photos.
I had a lot of fun working with her, and I think she will be reappearing for a cute Valentines day card after the new year!
Many thanks for stopping by...